

Posture Could Be the Culprit Behind Your Shoulder Pain
No one likes dealing with shoulder pain. The discomfort and immobility can prevent you from doing daily activities like grabbing something off a high shelf or reaching up to brush your hair. So, when your shoulder starts hurting, it’s important to figure out why.
Often, shoulder pain stems from an injury. For example, take rotator cuff tears, in which the muscles and tendons that wrap the shoulder become damaged: these injuries are common and can result from a sudden traumatic injury like a fall or develop gradually.
However, sometimes, shoulder pain might not have such a clear-cut cause. One of our patients learned this for herself–we’ll call her Diana. She was dealing with persistent shoulder pain and couldn’t figure out why. Fortunately, the physical therapists at Haymarket PT were on the case.
And the culprit? It turned out to be Diana’s posture.

Meet Diana, Receptionist Extraordinaire
Diana had worked as a receptionist and administrative assistant for years. She enjoyed her work, but it did require her to spend long hours sitting in front of a computer as she sifted through spreadsheets and calendar appointments.
Her issues with shoulder pain began gradually. They had always been a little stiff, but the restricted range of motion had worsened in the last few months. She also noticed tightness in her chest and twinges of pain throughout her shoulders and neck.
Diana tried to ignore her symptoms at first, thinking they’d eventually go away on their own. Instead, they became more frequent, worsening enough that Diana struggled to sit at her desk long enough to get any work done. That was when she came to visit us.
Our Physical Therapists Were on the Case
As always, we started Diana with a comprehensive assessment to help us understand the root cause of her discomfort. We took a health history, talked to her about potential injuries, and conducted several movement screens–including a postural screen.
The postural screen was where we made headway. After reviewing Diana’s posture while she was sitting, standing up, and moving around, we noticed the following:
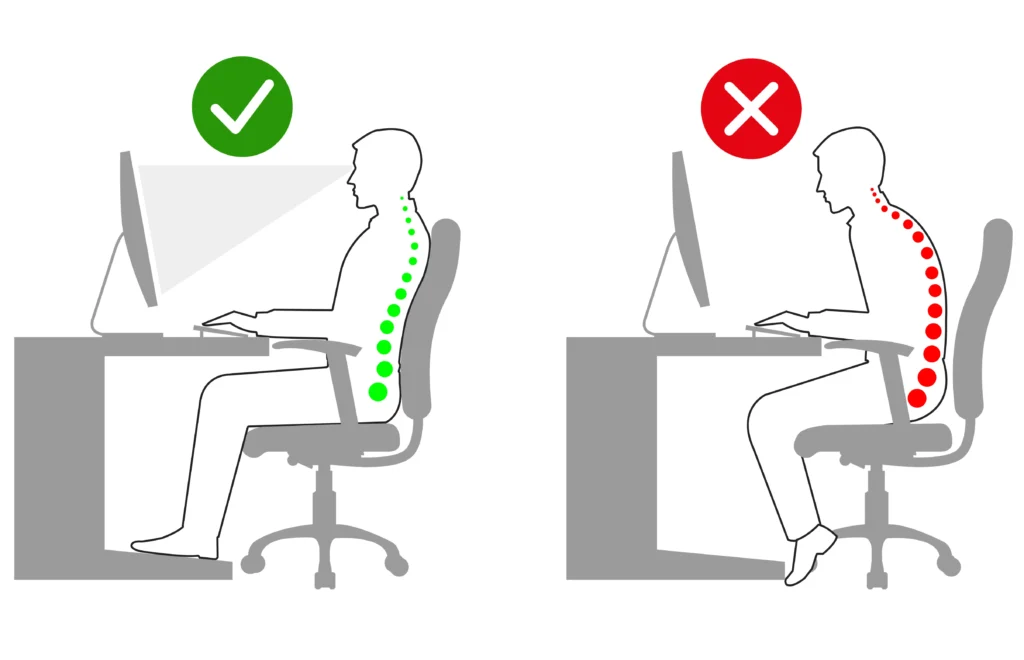
- She held her head forward in relation to her shoulders, a stance called “forward head posture.”
- She tended to round her shoulders, giving her slight kyphosis, or a hunched posture, in her upper back.
- Her shoulder blades were protracted away from her spine.
The signs were clear: Diana had developed upper cross syndrome.
Upper cross syndrome is a condition marked by postural changes that have a waterfall effect throughout the body. Diana’s postural impairments had impacted the muscles in her upper back and shoulder girdle. As a result, the movement in her upper body became impaired, leading to her pain and mobility restrictions.
A Personalized Solution to Lasting Pain Relief
Now that we understood why Diana was experiencing shoulder pain, we could develop a customized treatment to correct her posture and address the muscular impairments and imbalances that had led to her symptoms in the first place.
The foundation of Diana’s treatment was a comprehensive therapeutic exercise program. We began by improving her shoulder’s range of motion through simple mobility exercises.
After a few weeks, Diana was ready to begin strengthening the affected muscles. Using equipment like resistance bands and weights, we guided Diana through targeted exercises that addressed muscular weakness and imbalance.
Throughout her program, we also helped Diana improve her overall posture. Like many people, she thought postural improvements were about “sitting up straight.” In reality, she needed to keep her spine aligned as she moved through different postures throughout the day.
Because Diana had a desk job, we emphasized the importance of changing her posture regularly by taking quick breaks. Diana began using a timer to remind herself to get up every 30 minutes or so and walk around the office.
While it took a little effort on Diana’s part, eventually, her pain receded, and her shoulders were more mobile than they’d been in years. To make sure she didn’t relapse, we provided her with exercises to do at home to keep her upper body strong.
How to Improve Your Posture at Work
One study found that the average person spends a third of their life at work–so if you’re looking to improve your health and wellness, you need to take your job into consideration!
Unfortunately, many jobs can make this challenging. They force you into prolonged postures or require you to perform repetitive movements–both of which can strain your musculoskeletal system.
At Haymarket PT, our physical therapists can work with you to find solutions to any work-related concerns. Here are a few of the things we might suggest:
Find your ideal posture.
An ideal posture is one in which your spine rests in its natural alignment, whether sitting, standing, or moving around. This is something we can help you discover!
Take frequent breaks.
As the saying goes, “Your best posture is your next posture.” Find ways to move your body throughout the day. If you work an office job, this can be as simple as getting up every 30-40 minutes for five minutes. But even if you have a job that requires you to stand for long periods (such as retail or factory work), you still need to take breaks. Shift your weight, put a leg on a bench, or do some quick stretches–we can help you find quick, simple ways to move.
Pay attention to ergonomics:
The field of ergonomics focuses on improving your working environment for comfort and efficiency. Make sure your workstation (whether a chair and desk or a workbench) is the right height for your body. Use adaptive equipment as necessary. Our team can provide all the guidance you need!
Is Your Posture Causing You Pain?
Diana learned just how important posture is. If you’re struggling with persistent shoulder pain, call the team at Haymarket PT. We’ll dig down to the source–and give you the guidance you need to correct the issue.
Exercise Of The Month
Double Knees To Chest
Start on your back with your knees bent. Slowly bring both knees to your chest. Grasp your knees. Hold for 30 seconds and repeat.
1 Set, 3 Reps
Meet Our Team

Karen Hueni
Front Office Coordinator

Ashley Russo
Front Office Coordinator

Darlene Keplinger
Front Office Coordinator

Kaitlyn O’Grady
Rehabilitation Aide
Recipe of the Month: Cinnamon Rolls

Ingredients:
DOUGH
- ¾ cup milk
- 2 ¼ teaspoons active dry yeast
- ¼ cup granulated sugar
- 4 tablespoons salted butter, melted and cooled
- 1 large egg plus 1 large egg yolk, at room temperature
- 3 cups bread flour, plus more as needed
- ¾ teaspoon kosher salt
- Extra-virgin olive oil, for greasing the bowl
FILLING
- 4 tablespoons salted butter, softened
- ⅔ cup packed dark brown sugar
- 1 ½ tablespoons ground cinnamon
CREAM CHEESE FROSTING
- 4 oz cream cheese, softened
- ¾ cup powdered sugar
- 3 tablespoons salted butter, softened
- ½ teaspoon vanilla extract
Instructions:
- Warm milk in a microwave-safe bowl for 45–60 seconds, until 115°F. Pour into a stand mixer bowl fitted with the paddle attachment and sprinkle yeast on top. Add sugar and let sit until foamy, about 5 minutes. Add melted butter, egg, and egg yolk; mix on medium speed until combined, about 30 seconds. Stir in flour and salt with a wooden spoon until a dough begins to form.
- Attach the dough hook and knead on medium speed until soft and slightly sticky, 8–10 minutes. Add up to 3 tablespoons more flour if needed. (Alternatively, knead by hand on a floured surface for 8–10 minutes.) Warm a clean dish towel in the dryer during this step. Lightly grease a large bowl with olive oil. Transfer dough to the bowl, cover with plastic wrap and the warm towel, and let rise until doubled, 1–1½ hours. Dough is ready when an indentation from a finger does not spring back immediately.
- Dust a surface with flour and roll dough into a 10×14-inch rectangle. Spread softened butter evenly, leaving a ¼-inch margin on one short edge. Mix brown sugar and cinnamon; sprinkle over butter and gently press into it. Roll tightly from the opposite short side, pinch to seal, and place seam-side down. Trim ½ inch off each end. Compact the roll slightly by pressing inward from both ends. Cut into nine 1-inch slices using dental floss or a serrated knife.
- Line a 9-inch round or square pan with parchment. Arrange rolls in the pan, cover with plastic wrap and towel, and let rise until doubled and touching, 45–60 minutes. Preheat oven to 350°F. Bake rolls for 20–25 minutes, until golden on the edges but soft in the center. Cool for 10 minutes.
- In a mixer with the whisk attachment, beat cream cheese, powdered sugar, butter, and vanilla on low for 30 seconds, then on medium-high until smooth and fluffy, 1–2 minutes. Spread over warm rolls. Cover pan tightly or place rolls in airtight containers. Refrigerate up to 5 days. Reheat individual rolls in the microwave in 15-second intervals until warm.
Sources
- https://trialsjournal.biomedcentral.com/articles/10.1186/s13063-020-4159-9,
- https://www.jospt.org/doi/10.2519/jospt.2020.0501,
- https://www.jospt.org/doi/full/10.2519/jospt.2020.8498
- https://www.ambitiouskitchen.com/best-cinnamon-rolls/
- https://www.physio-pedia.com/Ergonomics,
- https://www.bls.gov/news.release/atus.nr0.htm